
 Abotts partners with NYPL to integrate with their partner libraries.
 Upworks Inc partners with ABOTTS to build their Oracle Cloud Infrastructure (OCI).
 Abotts Inc Partners with Gnorth consulting to deploy exadata and ODA.
🤖 Automating the Sierra Integration Project with Smart Scripting
When managing a large library system like Sierra, even small process delays can add up to hours of extra work. Manual steps, error-prone updates, and delayed data syncing often make things harder for both staff and patrons.
To solve this, we built a script-driven workflow that automates hold request extraction and tracking. This ensures faster processing, fewer errors, and better visibility of what’s happening in the system.
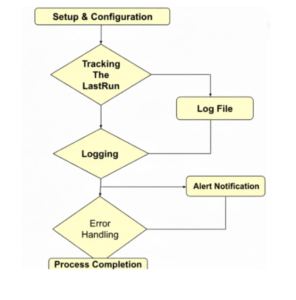
Here’s a step-by-step look at how the script works and why each piece matters.
Step 1: Setup & Configuration
The script starts by defining key settings:
- Database connection details.(use the db connection such as database name, port,host user etc)
- File paths for output CSVs and logs.
- Unique timestamps for each run (to prevent overwriting files).
This makes sure every execution is consistent and easy to trace.
Step 2: Tracking the Last Run
To avoid reprocessing old data, the script checks for a state file.
- If the file exists, it uses the stored timestamp to fetch only new hold requests.
- If it doesn’t exist, it falls back to a default start date.
This incremental approach means faster runs and no duplicate processing.
Step 3: Logging
Every run creates a log file that captures:
- Start and end times.
- Each step of the process.
- Successes and errors.
Logs are written both to the file and the console, making it easy to monitor progress in real time.
Step 4: Error Handling
If something goes wrong, the script:
- Records the error message, line number, and exit code.
- Stops execution immediately.
This makes troubleshooting simple and prevents incomplete or corrupted data exports.
Step 5: Data Extraction & Processing
Inside the database session, the script:
- Creates a temporary table for new hold requests.
- Filter them by location.
- Matches pickup locations to stop codes.
- Exports results (with book details + barcodes) into a CSV file.
- It provides staff with the right data in a simple format, making their job easier.
Step 6: Updating State
After exporting, the script saves the latest processed timestamp.
Next time it runs, it knows exactly where to start, avoiding overlaps.
Step 7: Completion
At the end, the script clearly reports as:
- Success which shows the file path of the exported data.
- Failure which displays detailed error info.
Flow Chart